What Is Heat Staking? A Plain-English Guide to Joining Plastics
By Alex Spurgeon — 2026-05-29
Heat staking is the process of joining a plastic part to another component — usually a piece of metal, a PCB, a lens, or another plastic — by melting a small plastic post (a "boss") and reforming the molten plastic into a head that captures the second part in place. Imagine a plastic rivet you grow on the spot instead of buying in a bag.
That's the whole idea. The rest is just doing it well enough that the joint outlasts the warranty card.
The short version
Skip to the FAQ if you want, but here's the bumper sticker:
• **What it is:** localised heating of a plastic boss, then forming the molten tip into a wider head while the underside is clamped against the part being captured.
• **What it joins:** thermoplastic-to-thermoplastic, or thermoplastic-to-anything-else (metal, glass, fabric, PCB).
• **What it doesn't join:** thermosets (phenolic, BMC, epoxy), and two pieces of metal to each other.
• **Why anyone uses it:** no fasteners, no consumables, no glue, no cure time, the part comes off the line ready to go.
How heat staking actually works
Four moves, in order, every time:
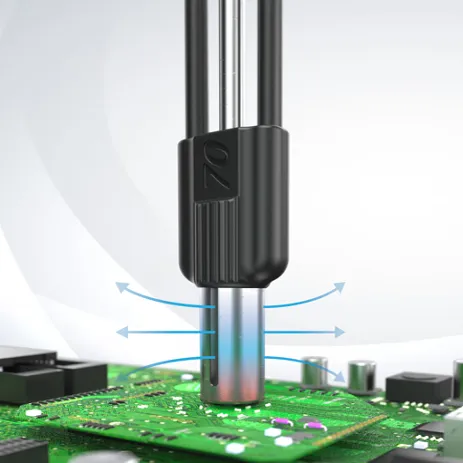
1. Mould the part with a stake boss. A small cylindrical post standing proud of the surface. The volume of plastic sticking up roughly equals the volume of the formed head you want. 2. Drop the second component over the boss. PCB, bracket, lens — the part you want clamped has a clearance hole that slides over the boss. 3. Heat and form. A thermal tip (or a hot-air column, depending on the process) softens the boss. The tip is shaped like the head profile you want — flush, dome, hollow, flared. As the boss softens, the tip presses down, forming the molten plastic into a head wider than the clearance hole. 4. Cool under load. The plastic re-solidifies into a permanent, captive head. The tip retracts. Done.
Whole cycle: a few seconds. On our Benchtop Press the impulse system heats the tip on demand, cools the tip with compressed air, and retracts without the molten plastic sticking. No drag, no stringing, no witness mark.
There's a longer, photo-by-photo walkthrough in The Heat Staking Process, Step by Step if you want to see each phase up close.
The heating methods, and why they matter
"Heat staking" is a family of processes, not one machine. The difference is how the heat gets into the boss. Pick the wrong one and you'll fight the part for the life of the program.
| Method | How heat gets in | Best for | Watch out for | |---|---|---|---| | Hot-tip (thermode) — continuous | A tip held at temperature all the time touches the boss | Cheap, simple, low-mix work | Sticking, stringing, drift as resin and ambient change | | Impulse / cold-tip | The tip heats on demand for the form, then cools before it retracts | Cosmetic A-surfaces, drift-prone resins, long runs | Slightly more press cost; far less scrap | | Hot-air / convection | A column of hot air softens the boss, a cold former shapes it | Delicate parts, no tip contact wanted | Slower, less localised, harder to control tightly | | Infrared | Radiant heat softens the boss without contact | Clean-room, no-contact needs | Equipment cost, harder on glass-filled resins | | Ultrasonic staking | High-frequency vibration generates heat at the boss tip | Very high volume, sub-second cycles | Micro-cracking risk, less forgiving of variation |
Most of what people picture when they say "heat staking" is hot-tip. The honest upgrade is impulse — same idea, but the tip is cold when it pulls away, so the molten plastic doesn't follow it up and leave a string or a witness mark. More on that below.
Stake-head geometry — the part everyone gets wrong
The head profile isn't cosmetic. It decides holding force, how much material you need, and whether you get a sink mark on the show surface. These are the profiles worth knowing:
| Head profile | What it looks like | Best for | Trade-off | |---|---|---|---| | Dome | Rounded, single radius | The default. Small bosses, general clamp | Slightly more material than flush | | Double dome | Two-radius mushroom | Medium bosses needing more head spread | Needs a bit more boss height | | Hollow / tubular | Ring of plastic, open centre | Large bosses; big head with little material; avoids sink marks; lets you reassemble with a self-tapping screw later | Tooling is fussier | | Flush | Pressed flat into a countersink | When the head can't stand above the surface | Less clamp height; needs a chamfered hole | | Flared / rosette | Splayed petals | Soft or thin-wall bosses, fabric capture | Lower pull-out than a dome | | Knurled | Textured, irregular | Strength and looks don't matter | Ugly; only for hidden joints |
Rule of thumb: dome unless you have a reason. Go hollow when the boss is fat enough that a solid dome would leave a sink mark on the opposite face, or when you want the option to drive a screw into the centre later. Go flush only when the assembly genuinely can't tolerate a proud head.
Boss design — get this right and the press is the easy bit
The single biggest predictor of a good joint isn't the machine, it's the boss the mould gives you. The numbers below are the starting points we use before tuning to the actual resin.
| Feature | Starting rule | |---|---| | Boss diameter | Around 2× the wall thickness it grows from — thick enough to hold, thin enough not to sink | | Boss height above the captured part | Roughly 1.5–2× the boss diameter of plastic available to form the head | | Clearance hole in the mating part | Boss diameter + 0.1–0.2 mm — snug, not a press fit | | Formed head diameter | About 1.5× the boss diameter for a standard dome | | Draft | A small draft on the boss helps moulding; keep it light so head volume stays predictable | | Base radius | A fillet where the boss meets the wall — sharp corners crack |
The mistake we see most: a boss that's too short. If there isn't enough plastic standing proud, you can't form a head bigger than the clearance hole, and the joint just spins or pulls straight through. Volume of plastic above the part roughly equals the volume of the head you're trying to form — design for that first.
Materials and temperatures
Heat staking only works on thermoplastics — plastics that soften when reheated. Thermosets char instead of flowing, so they're out. Here's where common resins land:
| Material | Heat stakes? | Notes | |---|---|---| | ABS | Yes | Easy, forgiving, clean heads | | PC (polycarbonate) | Yes | Great results; watch for stress-cracking near sharp corners | | PC/ABS | Yes | Workhorse, very forgiving | | Nylon (PA6 / PA66) | Yes | Absorbs moisture — dry before staking or you get foamy heads | | Polypropylene / polyethylene | Yes | Low melt point, needs gentle control; great for living-hinge parts | | Acetal (POM) | Yes | Narrow window; cools fast, form quickly | | Glass-filled grades (up to ~40%) | Yes | Heads come out rougher; fibres can surface | | PPS, PEEK | Specialist | High temps, specialist tooling | | PTFE | No | Doesn't form a clean head | | Thermosets (phenolic, BMC, epoxy) | No | They char, they don't flow |
On temperature, the working rule is roughly 60–80% of the resin's melt temperature at the boss — enough to flow, not so much that it degrades (Fictiv). Glass-filled plastics are the touchy ones: the process window can be under 10 °C. Too hot and the glass fibres surface, the head goes rough, and the plastic sticks to the tip. Too cold and the boss cracks instead of flowing. That narrow window is exactly why energy-metered impulse control beats a timer and a hot tip on filled resins. There's a deeper, resin-by-resin breakdown in our guide to heat staking plastic.
Where heat staking earns its money
Three places it consistently wins:
Capturing a non-plastic component inside a plastic housing. Bracket, lens, PCB, foam pad, fabric. Anything that isn't itself a thermoplastic still needs to be permanently held by something — heat staking turns the existing plastic boss into that fastener for free.
Replacing screws on cosmetic parts. No screw head showing, no thread inserts to install separately, no torque spec to argue about. The joint is internal and invisible.
Multi-point fastening in a single cycle. Our presses stake up to 8 bosses simultaneously under one cycle. Eight separate screw operations become one press-of-a-button.
Where it doesn't belong
The honest list, in keeping with house policy:
• **Thermosets.** Phenolic, BMC, epoxy, melamine. They don't soften when you re-heat them — they char. Use a different process.
• **Two pieces of metal.** Heat staking isn't welding. There's no metallurgical bond. You can capture metal *in* plastic, you can't join metal *to* metal.
• **Joints that need to come apart in service.** A staked head is a one-shot rivet. If the field tech needs to open the unit, use a screw, a snap, or a brass insert. (We wrote a [longer piece on brass inserts](https://usheatstake.com/blog/heat-staking-inserts-the-honest-guide) for the in-and-out case.)
• **Heavy load reversal.** A staked joint is great in shear and clamp, weak in straight pull-out. If the assembly will see repeated load reversals or vibration with tension components, design the fastener accordingly.
Heat staking vs the alternatives — the one-paragraph version
Vs screws: no consumable fastener, no driving step, no back-out risk, but no serviceability either. Cheaper at volume, harder to repair.
Vs adhesives: no cure time, no mess, no shelf life, but no chemical bond either — it's mechanical.
Vs ultrasonic welding: heat staking handles dissimilar materials (metal-in-plastic) that ultrasonic can't, with less risk of micro-cracking and generally lower equipment cost. Ultrasonic wins on sub-second cycle time at very high volumes.
The deeper comparison is its own post — see our heat staking vs ultrasonic welding guide.
Common failures, and what causes them
Nine times out of ten, a bad heat-stake joint traces back to one of these. This is the list I run through on the phone before anyone ships me a part:
| Symptom | Usual cause | Fix | |---|---|---| | Head sticks to the tip / strings on retract | Tip still hot when it pulls away | Switch to a cold-tip / impulse process, or add cooling dwell | | Sink mark on the opposite face | Too much solid plastic in a fat boss | Use a hollow head; thin the boss | | Boss cracks instead of forming | Too cold, or sharp base corner | Raise energy slightly; add a base fillet; dry hygroscopic resin | | Rough, fuzzy head | Glass-filled resin, or too hot | Lower energy; accept some texture on filled grades | | Joint spins or pulls through | Boss too short — not enough head | Redesign boss height; aim for head ~1.5× boss dia | | Foamy / bubbled head | Wet nylon | Dry the resin before staking | | Inconsistent heads across a run | Timer-and-hot-tip drift | Move to energy-metered control | | Witness mark on A-surface | Hot tip contact, over-travel | Cold tip, encoder-controlled depth |
If your scrap pattern shifts whenever the resin lot or the shop temperature changes, that's the tell-tale sign of a continuous hot-tip process drifting — and the case for impulse control.
What the press actually does
For a long time the industry sold "heat staking" as a heated tip, a stopwatch, and an operator. That works. It also drifts, strings, and burns parts the moment your resin batch shifts or the ambient temperature changes.
The modern alternative is impulse-controlled, energy-metered staking: the tip heats on demand, the system delivers a measured amount of energy (not "60 seconds at 280 °C"), the tip cools under compressed air, and the result is the same on cycle 1 as cycle 100,000. Our patent-pending Weld by Energy control system is one setting per joint — no timers, no dial-twiddling, no drift.
What that buys you on the floor:
• **No sticking or stringing on retract** (cold tip pulls away clean)
• **No witness marks** on cosmetic A-surfaces
• **0.1 mm encoder accuracy** so the press knows the boss is even there before it tries to stake it
• **Consistent heads** across long runs, multiple operators, drift-prone resins
If you're shopping presses, we wrote a no-nonsense Heat Staking Machine Buyer's Guide on what to look for and what to ignore in the brochure.
FAQ: Common questions about heat staking
Is heat staking the same as ultrasonic staking?
No. Ultrasonic staking uses high-frequency vibration to generate heat at the boss tip; heat staking uses a heated (or cooled) tool to transfer heat directly. Both end in a formed head, but the equipment, the cycle time, and the design rules differ. Ultrasonic is faster per stake; heat staking is more forgiving of material and geometry variation.
What materials can be heat staked?
Thermoplastics: ABS, PC, PC/ABS, nylon (PA6 / PA66), polypropylene, polyethylene, acetal, PPS. Glass-filled grades work but give a slightly rougher head. Thermosets, PTFE, and PEEK either won't work or need specialist equipment.
How long does a heat staking cycle take?
A few seconds. Most of that is controlled cool-down — the actual heating phase is usually sub-second. Multi-up tooling (up to 8 bosses in one cycle on our Benchtop Press) keeps cycle time flat as part complexity grows.
What temperature do you heat stake at?
There's no single number — it's roughly 60–80% of the resin's melt temperature at the boss, set by energy rather than a dial. Glass-filled resins have a window under 10 °C wide, which is why metered-energy control matters more than a temperature setpoint.
How strong is a heat-staked joint?
Strong in shear and clamp, weaker in straight pull-out. Holding force scales with head diameter and boss quality. For a standard dome, design the head at about 1.5× the boss diameter and you'll get reliable retention for housings, brackets, and PCBs.
Is heat staking a permanent join?
Yes. You can drill the head off if you absolutely have to, but you'll destroy the boss in the process. If you need a join that comes apart, use a brass insert and a machine screw instead.
Does it work on metal?
It captures metal — bracket, washer, sleeve — between plastic. It doesn't bond metal to metal. There's no fusion, just mechanical clamp.
The short, honest summary
Heat staking is one of the quieter wins in plastic assembly: a moulding feature you already have becoming a permanent fastener at almost zero per-part cost. The trick is matching the process to the part — get the boss geometry, the resin, and the head style to agree, and the press becomes the easy bit.
We design and build impulse heat staking and brass insert systems in Roanoke, Indiana, and we'll quote a free evaluation within 24 hours of seeing your part. If you're not sure whether heat staking is the right fit, send it through — sometimes the answer is "use a screw" and that's still useful information. Give us a call.