The Heat Staking Process, Step by Step (No Jargon)
By Alex Spurgeon — 2026-05-26
Heat staking is a thermoplastic joining process. You soften the tip of a moulded plastic boss with controlled heat, reshape it under light pressure into a formed head wider than the through-hole, and cool it until it sets. The head captures a second component — a metal bracket, a PCB, a lens, a fabric layer — against the parent part. No screws. No glue. No cure time. The plastic itself becomes the rivet.
That's the whole movie in 70 words. The rest of this post is the bit nobody puts in their PowerPoint — what each phase actually does to the plastic, the numbers worth knowing, what to do when your heads come out wrong, and the straight answers to the questions I get most often on the phone. Marco-on-the-floor energy, one beer in. If you want the ground-floor version first, our guide to what heat staking actually is sets the scene.
How the heat staking process works (step by step)
Four phases. Approach. Heat. Form and cool. Retract. Anyone selling you six or seven phases is splitting hairs to fill out a slide deck.
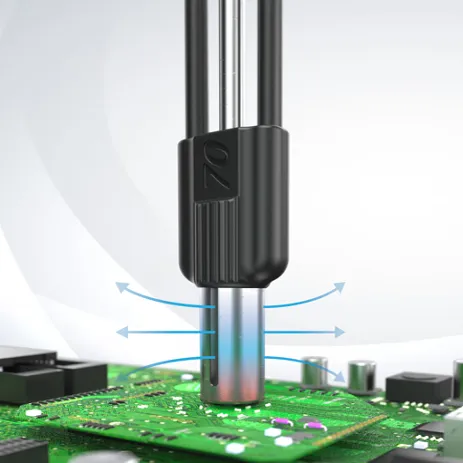
1. Approach. The tip drops down toward the boss tip. Two things matter here that nobody talks about: a repeatable home position (drift it by half a millimetre and your head heights drift with it), and a soft landing (slamming a tip into a sharp boss is how you crack one in twenty parts and chase your tail for three weeks). Our benchtop runs a linear encoder with 0.1 mm accuracy that confirms the boss is even there before the cycle starts. Sounds basic. You'd be amazed how many "intermittent cracking" calls turn out to be a missing boss the press never noticed.
2. Heat. The tip contacts the boss tip and softens roughly 1 to 2 mm at the top — not the whole post. The rest of the boss stays rigid, which is what holds the part located while the head forms. Hot probe, hot air, or impulse — they're three different heater families, not three flavours of the same thing. (More on that below.)
3. Form and cool. The softened material flows under the forming face of the tool and takes the negative shape of the cavity — flat button, dome, hollow, flared, whatever the design wants. Heat staking pressure here is low — a few hundred newtons per stake point. Plastic that's already soft doesn't need crushing; it needs guiding. The head forms by progressive melting of the boss under continuous, controlled pressure — it's the right combination of heat and pressure that matters, not brute force (Branson/Emerson thermal staking design guide). Cramming the tip down to make a "really solid" head cracks the boss base, traps stress, and ships you a part that passes inspection on Tuesday and fails in the field three months later. More force is not more strength.
Cooling is the phase that locks in dimensional accuracy. Pull the tool away while the plastic is still soft and you get springback, slump, or a string the size of a baby spider's web. Hold under pressure until it resolidifies and the head stays exactly where you formed it. Our impulse cycle — Heat → Cool → Retract — uses compressed air through the tip to cool actively, not passively, so the plastic is solid before the tool moves.
4. Retract. Tool lifts. Cycle ends. If you got phases 1 through 3 right, retract is uneventful. If you didn't, this is where the truth comes out — stringing, sticking, lifted heads, the dreaded little centre nipple. The press tells on you on the way back home.
What materials can be heat staked
Most unfilled and lightly filled thermoplastics stake well. The two categories behave differently and that matters for your process window:
Amorphous plastics soften over a wide range. ABS, polycarbonate, PC/ABS — forgiving, easy thermal window, beginner-friendly. Semicrystalline plastics have a sharp melt transition. Nylon, acetal (POM), polypropylene — a few degrees too cold and nothing flows, a few too hot and you're cooking it. Tighten your process control accordingly; semicrystalline resins like polyamides, acetal, and polypropylene have to be run at a fairly specific process temperature to get reproducible results (bdtronic). There's a fuller, material-by-material breakdown in our guide to heat staking plastic.
Here are the starting points I'd give someone walking into the shop (tip temperatures, as of 2026) — for the full by-plastic breakdown, see our guide to heat staking temperature. As a sanity check, optimal staking temperature typically lands around 60–80% of the resin's melt temperature (Fictiv):
| Material | Tip temp (°C) | Tip temp (°F) | Behaviour notes | |---|---|---|---| | ABS | 210–230 | 410–446 | Easy to stake, clean cosmetic heads | | Polycarbonate (PC) | 270–290 | 518–554 | Strings if you push past ~300°C | | PC/ABS blend | 240–260 | 464–500 | Intermediate, well-behaved | | Nylon (PA6 / PA66) | 240–270 | 464–518 | Dry the part before staking | | Polypropylene (PP) | 230–260 | 446–500 | Semicrystalline, narrow window | | Acetal (POM) | 220–240 | 428–464 | Sensitive to overheat, watch dwell | | Glass-filled nylon (30%) | 260–290 | 500–554 | Functional but cosmetically rough — see below |
Glass-filled resins above ~30% fibre loading come out matte and slightly hairy. Nine out of ten "your machine is making rough fuzzy heads" calls I get are the same thing — glass fill. The customer is running 30% glass PA66 and expecting the glossy little dome they'd get off ABS. But glass fibres don't melt. Only the resin around them does. So the fibres sit proud at the surface and the head looks like it just got out of the pool. Nothing wrong with the press. You run a bit more heat, a longer dwell, and you accept that glass-filled heads are never going to be cosmetic. (If they're on a show face, switch to a hollow head style or reconsider whether staking belongs there at all.)
Thermosets are out. Phenolic, epoxy, BMC — they don't soften when you reheat them, they char. Knowing the difference between "won't stake" and "can't stake" is half the job. (Wikipedia on plastic welding and the Society of Plastics Engineers cover the longer reading list.)
What head shapes can heat staking make?
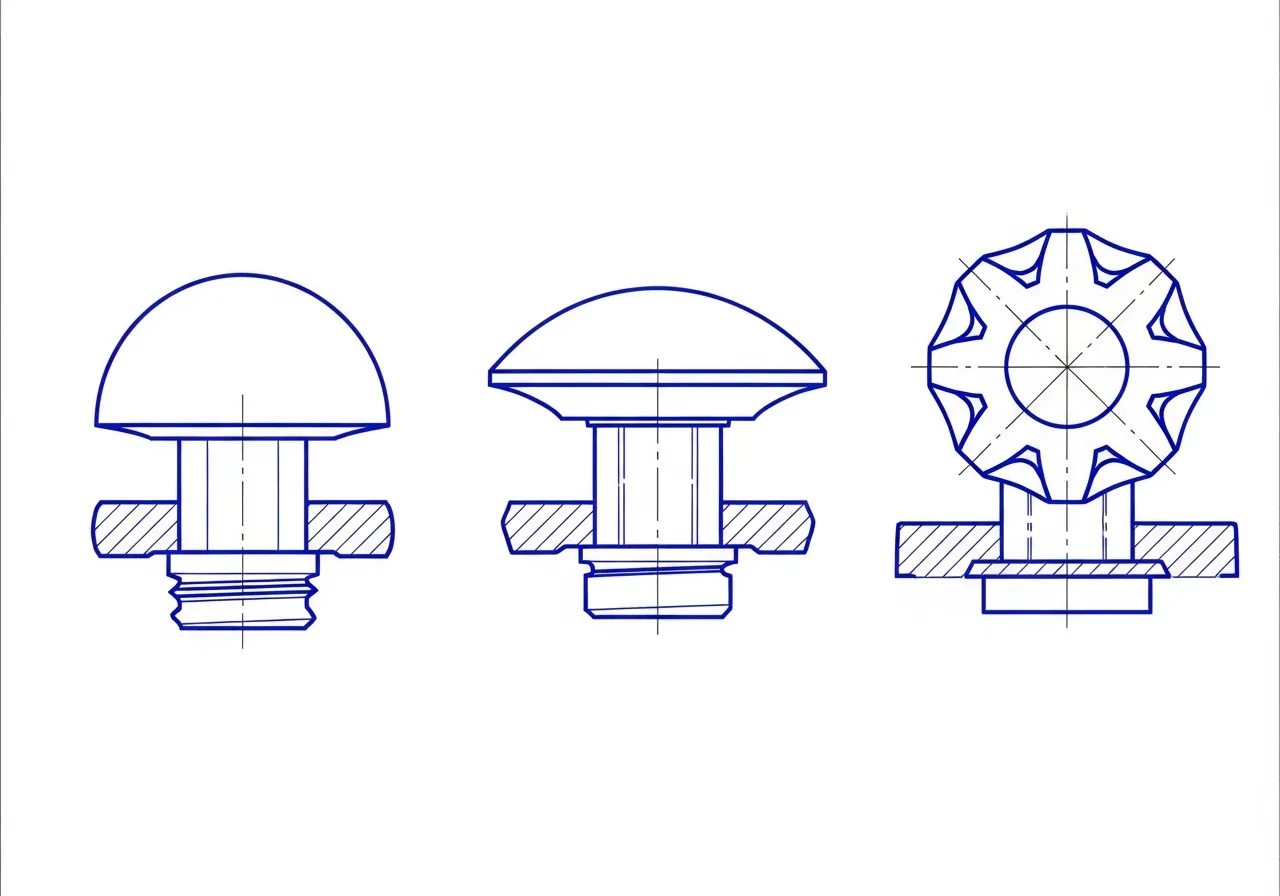
The tip you bolt on decides the head shape, and the head shape decides what the joint can do.
| Head type | Boss height | Best for | Trade-off | |---|---|---|---| | Flat / cylindrical | 1.5–2× boss diameter | Broad clamp load, high volume | Plain look | | Dome / rounded | 1.5–2× boss diameter | Visible surfaces, low stress concentration | Slightly smaller clamp area | | Rosette / flared | 1.5–2× boss diameter | High pull-out, anti-rotation | More tip cost, fussier tooling | | Dimpled / concave | 1.5–2× boss diameter | Controlled flash, cosmetic | Less clamp area | | Hollow / tubular | ≥ 2× wall thickness | Thick bosses, future serviceability | Hollow head, can reopen with a self-tapper | | Knurled / ribbed | 1.5–2× boss diameter | Torque transfer, vibration | Boss tooling more complex |
If you take one number away, take this: boss height of roughly 1.5 to 2 times the boss diameter is the starting point for almost every head style. The full dimensional guide lives in the Heat Staking Design Guide.
When formed heads go wrong — a diagnostic table
The cleanest way to debug heat staking: look at what the head is doing wrong and work backwards. Tape this to the press.
| What the head looks like | Most likely cause | First thing to try | |---|---|---| | Cracked at the boss base | Sharp internal corner; too much pressure | Add a 0.4 mm fillet at the boss base; drop the pressure | | Off-centre or oval | Tip not square to boss; sloppy fixture | Re-square the tip; tighten the fixture | | Centre nipple on the head | Sharp boss tip concentrating heat | Add a 0.25–0.5 mm chamfer at the boss tip | | Stringing on retract | Tip too hot, leaving while plastic is still soft | Drop tip temp; extend cooling under pressure | | Sticking to the tip | No tip coating; tip leaving while sticky | Add PTFE coating; cool through the tip before retract | | Brown / smoking head | Tip temp too high for the polymer | Match recipe to the actual material | | Hairy or matte head | Glass-filled resin, fibres at surface | Accept it, or switch head style | | Springback after retract | Insufficient cooling under load | Hold pressure for at least the heat time |
Heater types — the part nobody mentions
The heater is the single biggest determinant of cosmetic quality and most people pick wrong on the first program. Three families:
Hot probe — a tip held at constant temperature. Cheap, simple, ubiquitous. Tends to string and leave witness marks because the tip is in contact with soft plastic on retract. Fine for hidden internal bosses.
Hot air — heats the boss without contact, then a cool tool forms it. Excellent cosmetics, no sticking, good for forming a dozen bosses at once. More expensive station; longer cycle.
Impulse — short controlled bursts of heat during contact, then active cooling through the same tip before retract. The patent-pending Weld by Energy control on our presses delivers the precise energy each cycle needs — no timer juggling on the floor at 4pm trying to figure out why this morning's heads were fine and this afternoon's are flashy. Timer-based "precision" is, in my book, the assembly equivalent of dead reckoning.
Short version: the heater follows the part, not the shop's capex. For a fuller breakdown of cartridge, hot-air, and impulse heating and where each one wins, see heat staking heater types.
When should you NOT use heat staking?
A staked head is essentially a one-shot plastic rivet — strong in shear and clamp, weak when you pull straight out, and destroyed if you ever need to take it apart. If the joint sees repeated load reversal or needs field service, that's a screw, a snap-fit, or a brass threaded insert, not a stake. We'll tell you when not to use the process. That bit isn't optional.
The honest disqualifiers:
• The assembly needs to come apart for service (use inserts or screws)
• The joint sees constant tension or repeated load reversal (use a fastener)
• The material is a thermoset (it physically can't soften and re-form)
• The boss is on a show face *and* the resin is 30%+ glass-filled (cosmetics will lose)
Get this list wrong and no amount of press wizardry saves you.
FAQ
What is heat staking used for? Joining a plastic part to one or more other components — typically a metal bracket, a PCB, a lens, a label or a fabric layer — by reshaping a moulded plastic boss into a permanent head that captures the second component. Common in automotive interiors, white goods, medical devices, and electronics enclosures.
What's the difference between heat staking and ultrasonic welding? Heat staking forms a mechanical head — the captured component is held by geometry, not by molecular bonding. Ultrasonic welding fuses two thermoplastic surfaces molecularly using high-frequency vibration. Heat staking joins dissimilar materials (metal to plastic, fabric to plastic); ultrasonic welding joins plastic to plastic of compatible families. The full comparison is in the Heat Staking vs Ultrasonic Welding resource.
What materials can be heat staked? Most amorphous and semicrystalline thermoplastics — ABS, PC, PC/ABS, nylon, polypropylene, acetal, PPS, PEEK. Glass-filled grades work functionally but lose cosmetics. Thermosets (phenolic, epoxy, BMC) cannot be heat staked at all.
What temperature is used for heat staking? Temperature is set by the polymer, not the press. Typical tip temperatures range from 210°C (ABS) to 290°C (PC, glass-filled nylon). Anyone quoting you "we stake everything at 250°C" doesn't understand the job.
Can heat-staked parts be disassembled? Mostly no — a solid stake is destroyed if you remove it. The exception is a hollow head: drill or pop the head off, and the boss accepts a self-tapping screw for re-assembly. If serviceability is a hard requirement, design for it from the start with a hollow head or a brass threaded insert.
Is a heat-staked joint strong? Yes — in shear and clamp load, very. Pull-out strength depends on head geometry, boss diameter, and how well the cooling phase was held under pressure. A staked joint will reliably outlast the product, the warranty, and possibly the engineer who designed it.
How long does a heat staking cycle take? Usually 2 to 6 seconds total per stake point with impulse equipment, longer with hot probe. Multi-tip tools stake several bosses simultaneously — our benchtop runs up to 8 bosses per cycle.
A rule of thumb before you call
Nine out of ten "the head won't form" jobs come down to three things, in this order: boss geometry, polymer-matched recipe, cooling under pressure. Fix those first. If the head is forming but looks wrong — fuzzy, stringy, burnt, off-centre — that's a heater or a tip-finish issue, and the diagnostic table above is the place to start.
If you'd like our team to look at a specific part — material, boss geometry, target head profile, cycle-time budget — send the print and a photo through the contact form. Free evaluation. 24-hour quote turnaround. Every machine is U.S.-built out of Roanoke, Indiana, with 24-hour service response. Some builds go out in as little as four weeks. (Yes, that includes the overseas customers. No, the time zones don't faze us.)
Get the four phases right and you've got a permanent, repeatable, cosmetically clean joint with no fasteners, no adhesives, and no consumables. Get them wrong and you've got a parts bin full of laminated cautionary tales. I keep a couple above the kettle. Motivational.